> ## Documentation Index
> Fetch the complete documentation index at: https://docs-dev-docs-ai-docs-migration-poc.mintlify.site/llms.txt
> Use this file to discover all available pages before exploring further.
# Rich Authorization Requests(RAR)を構成する
> APIのRich Authorization Requests(RAR)を構成する方法をご説明します。
ハイリーレギュレーテッドアイデンティティ機能を使用するには、エンタープライズプランとハイリーレギュレーテッドアイデンティティアドオンが必要です。詳細については、「[Auth0の価格設定](https://auth0.com/pricing/)」を参照してください。
## 前提条件
APIのRich Authorization Requests(RAR)構成する前に、以下をセットアップします。
* [カスタムドメイン](/docs/ja-jp/customize/custom-domains)
* [カスタムのユニバーサルログインページ](/docs/ja-jp/customize/login-pages/universal-login/customize-templates)テンプレートManagement APIを使用してユニバーサルログインページのテンプレートをカスタマイズする方法については、「[ページテンプレートAPI](/docs/ja-jp/customize/universal-login-pages/universal-login-page-templates#page-templates-api)」をお読みください。
## リソースサーバーを構成する
### 同意ポリシーを設定する
同意ポリシーは、Auth0がいつ、どのようにして同意プロンプトをエンドユーザーに提示するかを定めます。
Auth0テナントに登録されているリソースサーバー(すなわちAPI)は、Rich Authorization Request(RAR)を承認する際にどの同意ポリシーを適用するかを事前に定義する必要があります。
デフォルトの同意ポリシーは、`null`または未定義です。Auth0は同意ポリシーの`transactional-authorization-with-mfa`もサポートしており、これは、リソース所有者(すなわちエンドユーザー)の明示的同意が常に必要なトランザクション認可のユースケースに対応します。Auth0の同意ポリシーの動作を下の表にまとめました。
| Rich Authorization Request? | MFA必須? | `null`または未定義(デフォルト) | `transactional-authorization-with-mfa` |
| --------------------------- | ------------------- | ----------------------------------- | ---------------------------------------------------- |
| いいえ | いいえ | 要求されるアクセス権を含む付与がない限りは、標準の同意が表示されます。 | 以前付与されたアクセス権に関わらずカスタマイズされた同意が表示されます。 |
| はい | いいえ | 認可要求は`invalid_request`で拒否されます。 | 以前付与されたアクセス権に関わらずカスタマイズされた同意が表示されます。 |
| はい | はい。プッシュ通知でない認証要素を使用 | 認可要求は`invalid_request`で拒否されます。 | ユーザーがMFAチャレンジを完了した後、カスタマイズされた同意が表示されます。 |
| はい | はい。プッシュ通知要素を使用 | 認可要求は`invalid_request`で拒否されます。 | 同意は表示されません。同意は、プッシュ通知チャレンジを受け取ったモバイルアプリケーションで対処されます。 |
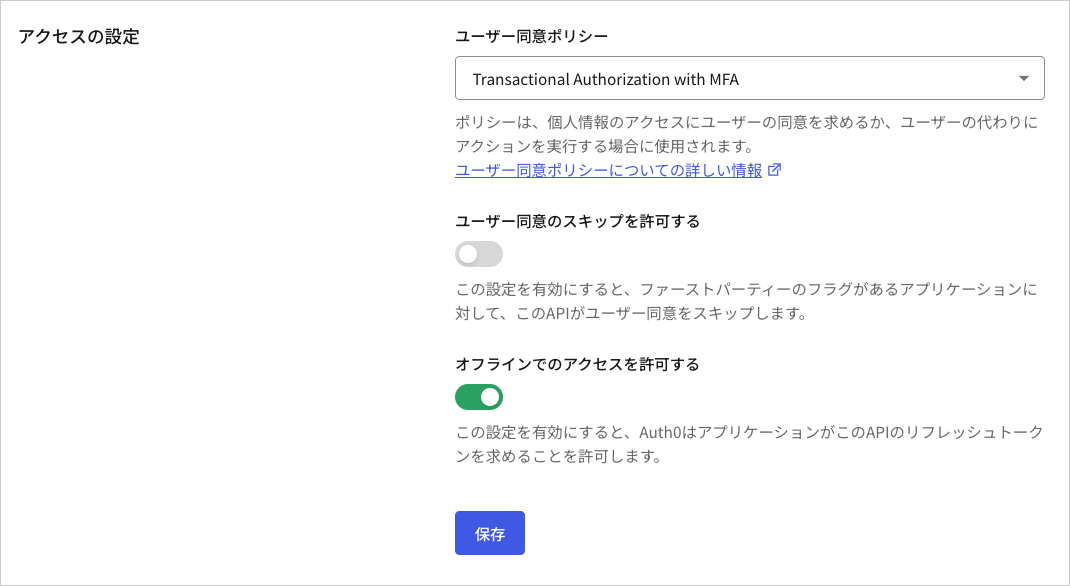
Auth0 Dashboardを使用してAPI設定に同意ポリシーを設定します。
1. [[Auth0 Dashboard] > [Applications(アプリケーション)] > [APIs]](https://manage.auth0.com/#/apis)に移動します。
2. **[Settings(設定)]** タブを選択します。
3. **[Access Settings(アクセス設定)]** の下の、**[Transactional Authorization with MFA(MFAを使用したトランザクション認可)]** を選択します。
4. 変更を保存します。
 Management APIの[リソースサーバーの更新](https://auth0.com/docs/api/management/v2/resource-servers/patch-resource-servers-by-id)エンドポイントへの次のPATCH要求は、既存のリソースサーバーに対する同意ポリシーを`transactional-authorization-with-mfa`に設定します。
```bash lines theme={null}
curl --location --request PATCH 'https://$tenant/api/v2/resource-servers/$resource-server-id' \ --header 'Authorization: Bearer $management_access_token' \ --header 'Content-Type: application/json' \ --data-raw '{ "consent_policy": "standard" }'
```
### authorization\_detailsタイプを登録する
リソースサーバーは、許可されたスコープの登録と同様に、承認された`authorization_details`タイプを登録しなければなりません。`authorization_details`が以下の要件を満たしていることを確認してください。
* 5Kbが上限です
* 有効なJSONでなければなりません
* オブジェクトの配列でなければなりません
* 配列には5エントリが上限です
* すべてのオブジェクトには`type`プロパティが必要です(APIに事前登録)
* オブジェクトあたりのプロパティは10個が上限です
* プロパティ名の長さは255文字が上限です
* プロパティ値の長さは255文字が上限です
* ネストされたオブジェクトは5レベルが上限です
* プロパティ名には次の文字のみを使用できます:`a-zA-Z0-9_.-`
`authorization_details`タイプの登録には、[Auth0 Dashboard](https://manage.auth0.com/)または[Management API](https://auth0.com/docs/api/management/v2)を使用できます。
Auth0 Dashboardで`authorization_details` を追加することができます。
1. [[Auth0 Dashboard] > [Applications(アプリケーション)] > [APIs]](https://manage.auth0.com/#/apis)に移動します。
2. **[Permissions(権限)]** タブを選択します。
3. **[Add an Authorization Details Type(認可詳細タイプの追加)]** の下に、`payment_initiation`を追加します。**[+Add(+追加)]** オプションを選択します。`money_transfer`を追加し、**[+Add(+追加)]** オプションを選択します。
次のPATCH要求は、Management APIの[リソースサーバーの更新](https://auth0.com/docs/api/management/v2/resource-servers/patch-resource-servers-by-id)エンドポイントに対して、`payment_initiation`と`money_transfer`を既存のリソースサーバーの`authorization_details`タイプとして登録します。
```bash lines theme={null}
curl --location --request PATCH 'https://$tenant/api/v2/resource-servers/$resource-server-id' \
--header 'Authorization: Bearer $management_access_token' \
--header 'Content-Type: application/json' \
--data-raw '{
"authorization_details": [{"type": "payment_initiation"}, {"type": "money_transfer"}]
}'
```
### Rich Authorization Requestsのリソースサーバーを作成する
以下のPOST要求はRich Authorization Requests(リッチ認可要求)を受け取るリソースサーバーを作成して構成します。
```bash lines theme={null}
curl --location --request POST 'https://$tenant/api/v2/resource-servers' \
--header 'Authorization: Bearer $management_access_token' \
--header 'Content-Type: application/json' \
--data-raw '{
"name": "Payments API",
"identifier": "https://payments.api/",
"consent_policy": "standard",
"authorization_details": [{"type": "payment_initiation"}]
}'
```
## カスタマイズされた同意プロンプトを設定して認可詳細を表示する
Rich Authorization Requests(リッチ認可要求)の認可詳細を同意画面に表示するには、適切なテンプレートのパーシャルを使用して`customized-consent`プロンプトを構成する必要があります。
以下のPUT要求は、カスタマイズされた同意のパーシャルを構成します。
```bash lines theme={null}
curl --location --request PUT "https://$tenant/api/v2/prompts/customized-consent/partials" \
--header "Authorization: Bearer $management_access_token" \
--header "Content-Type: application/json" \
--data '{
"customized-consent": {
"form-content": "
Management APIの[リソースサーバーの更新](https://auth0.com/docs/api/management/v2/resource-servers/patch-resource-servers-by-id)エンドポイントへの次のPATCH要求は、既存のリソースサーバーに対する同意ポリシーを`transactional-authorization-with-mfa`に設定します。
```bash lines theme={null}
curl --location --request PATCH 'https://$tenant/api/v2/resource-servers/$resource-server-id' \ --header 'Authorization: Bearer $management_access_token' \ --header 'Content-Type: application/json' \ --data-raw '{ "consent_policy": "standard" }'
```
### authorization\_detailsタイプを登録する
リソースサーバーは、許可されたスコープの登録と同様に、承認された`authorization_details`タイプを登録しなければなりません。`authorization_details`が以下の要件を満たしていることを確認してください。
* 5Kbが上限です
* 有効なJSONでなければなりません
* オブジェクトの配列でなければなりません
* 配列には5エントリが上限です
* すべてのオブジェクトには`type`プロパティが必要です(APIに事前登録)
* オブジェクトあたりのプロパティは10個が上限です
* プロパティ名の長さは255文字が上限です
* プロパティ値の長さは255文字が上限です
* ネストされたオブジェクトは5レベルが上限です
* プロパティ名には次の文字のみを使用できます:`a-zA-Z0-9_.-`
`authorization_details`タイプの登録には、[Auth0 Dashboard](https://manage.auth0.com/)または[Management API](https://auth0.com/docs/api/management/v2)を使用できます。
Auth0 Dashboardで`authorization_details` を追加することができます。
1. [[Auth0 Dashboard] > [Applications(アプリケーション)] > [APIs]](https://manage.auth0.com/#/apis)に移動します。
2. **[Permissions(権限)]** タブを選択します。
3. **[Add an Authorization Details Type(認可詳細タイプの追加)]** の下に、`payment_initiation`を追加します。**[+Add(+追加)]** オプションを選択します。`money_transfer`を追加し、**[+Add(+追加)]** オプションを選択します。
次のPATCH要求は、Management APIの[リソースサーバーの更新](https://auth0.com/docs/api/management/v2/resource-servers/patch-resource-servers-by-id)エンドポイントに対して、`payment_initiation`と`money_transfer`を既存のリソースサーバーの`authorization_details`タイプとして登録します。
```bash lines theme={null}
curl --location --request PATCH 'https://$tenant/api/v2/resource-servers/$resource-server-id' \
--header 'Authorization: Bearer $management_access_token' \
--header 'Content-Type: application/json' \
--data-raw '{
"authorization_details": [{"type": "payment_initiation"}, {"type": "money_transfer"}]
}'
```
### Rich Authorization Requestsのリソースサーバーを作成する
以下のPOST要求はRich Authorization Requests(リッチ認可要求)を受け取るリソースサーバーを作成して構成します。
```bash lines theme={null}
curl --location --request POST 'https://$tenant/api/v2/resource-servers' \
--header 'Authorization: Bearer $management_access_token' \
--header 'Content-Type: application/json' \
--data-raw '{
"name": "Payments API",
"identifier": "https://payments.api/",
"consent_policy": "standard",
"authorization_details": [{"type": "payment_initiation"}]
}'
```
## カスタマイズされた同意プロンプトを設定して認可詳細を表示する
Rich Authorization Requests(リッチ認可要求)の認可詳細を同意画面に表示するには、適切なテンプレートのパーシャルを使用して`customized-consent`プロンプトを構成する必要があります。
以下のPUT要求は、カスタマイズされた同意のパーシャルを構成します。
```bash lines theme={null}
curl --location --request PUT "https://$tenant/api/v2/prompts/customized-consent/partials" \
--header "Authorization: Bearer $management_access_token" \
--header "Content-Type: application/json" \
--data '{
"customized-consent": {
"form-content": "Operation Details
Transaction Type
{{ transaction.params.authorization_details[0].type }}
Amount
{{ transaction.params.authorization_details[0].instructedAmount.amount }} {{ transaction.params.authorization_details[0].instructedAmount.currency }}
Recipient
{{ transaction.params.authorization_details[0].beneficiary }}
Destination Account
{{ transaction.params.authorization_details[0].destinationAccount }}
"
}
}'
```
カスタマイズされた同意テンプレートは、Auth0がエンドユーザーに表示する以下の同意プロンプト内に認可詳細をレンダリングします。
同意プロンプトをカスタマイズする方法については、「[新しいユニバーサルログインページをカスタマイズする](/docs/ja-jp/customize/login-pages/universal-login/customize-templates)」と「[ノーコードエディターで新しいユニバーサルログインをカスタマイズする](/docs/ja-jp/customize/login-pages/universal-login/customize-themes)」をお読みください。